

Remember where we started? It was time for something lighter.

We chose white subway tile to keep a clean, neutral look in the room. White goes with everything, in my opinion, so if we ever decide to change up our color scheme, it's easy to simply swap out accessories. I also think it will help the room to look cleaner and less cluttered when we have extra things out on the counter.
We have seen enough Rehab Addict episodes to feel like we could handle a backsplash, so tackling this ourselves was a no-brainer. A few blogs and YouTube videos later, we were ready to start!
Supplies List
Subway tiles 3 x 6
Bullnose tiles 6 x 6
Corner bullnose tiles 6 x 6
Mastic
Grout
Water
Bucket
Tile Spacers (1/8 inch)
Long board (for level line)
Level
Scraper
Pencil
Sponge
Notched tile trough
Grout float
Tile cutter
Caulk
Process
Step 1: Draw level line
Using a long board against the wall with a level on top, draw a level line across the wall. This will give you a guide to follow other than your counters and your cabinets that will help all of your tile to look level. (If your tile meets in a corner where two cabinets or counters weren't perfectly level, the mistake will show where they come together.)
You can see in this picture that our counters are not EXACTLY level, so we went ahead and drew a line on this wall.


Apply mastic with a scraper on a small surface. You don't want to apply so much that it dries before you get to it. After covering the area you will work with, go over the mastic with the tile trough to create grooves. This makes it easier for the tile to adhere to the mastic.


Step 3: Begin placing tiles
We started at one side of our counter and worked our way across. Since we did this, we had to cut half of our subway tiles in half (every other one) to make the first edge on the left. With these tiles, we put the cut edge toward the door frame on the left side so that the finished edge would show on the right.


To use the tile cutter, mark where you need to cut the tile and line up this mark with the arrow on your tile cutter. Push the guide up against the tile and secure it to hold the tile in place. Grab the handle and put the scorer on the outer edge of the tile. Push down gently and pull the scorer across the tile until the whole tile is scored. Pull the handle until it is on the top side of your tile. Push down on the handle to break the tile along the score line. I added some pictures to help you see the process.
Mark the tile:

Score the tile (drag the scorer across the tile):

Break the tile (push the handle down to break the tile along the scored edge):

We placed the tiles one at a time on the mastic, aligning the bottom tile with the level line, and then used the spacers between each tile to keep the grout spaces consistent. The basic process is to place the tile about where it should go, then put a spacer between it and the previous tile(s). Then, push it up against those spacers so that it lines up correctly.

I worked from bottom to top and placed every other tile, then moved to the right and did the same thing again (see below).

To tile around our window, we just put the cut side of the tile toward the window. We chose to do this because we planned to install a window sill over these edges to hide most of them. (More on that later in this tutorial.)

For edges that ended out in the open (not in a corner or against a wall or cabinet), we used bullnose tile. This only came in 6 x 6 inch tiles at Home Depot, so we simply cut these in half.


We also had one tile that was completely exposed on the side and the top, so we purchased a package of 6 x 6 inch bullnose corner tiles to use here. We just cut one of these in half twice and used the corner that was rounded on both sides. (The rounded bullnose do not look good on the un-rounded edges, so that is why we opted for the bullnose corner tile. The non-bullnose tiles look great on the edges, though!)
You can also see where we had to made multiple cuts to one tile. With a tile saw, I'm sure you can work around this so that the cut doesn't go all the way through (you can just cut off the corner), but the grout covered up the cracks pretty well, so we were okay with it.

Step 3: Let mastic dry overnight
Once all of your tiles have been placed, let everything set up overnight. The next day, remove the tile spacers to get ready to grout.

Step 4: Prep for Grout
Tape off the edges around your tile to get a clean grout line. We used painters tape to make a clean line between the tile and the walls so that the grout didn't get everywhere. We took this off when we finished wiping down the grout so that it didn't dry between the grout and the walls.

Step 5: Mix grout
Grout is a few steps in itself, but it involves much less thinking and precision, so we enjoyed this part the most. To mix the grout, we followed the directions on the bag and mixed the grout and water in a bucket with a putty knife. It's important to mix this in small batches so it doesn't dry out before you finish using it. We went ahead and used the whole bag because we were moving pretty fast, but we had a lot of grout left over, so we probably could have done with just half a bag.

Step 6: Apply grout
We took the grout float and scooped some of the grout up with it. Then, we just mashed the grout all over the tile (and between the tiles, of course). You can see that some of it got on the counters. We were able to wipe this up easily, but if you want to save yourself that effort, you can always put down paper on the counters before you start.

Step 7: Remove excess grout
We made sure all of the spaces between the tile were covered and then used the float at an angle to drag off any excess grout we could see. Then, we went back with the sponge and water to wipe up the rest. This cleaned the front of the tiles and smoothed the grout between the tiles. Pull off any excess tape before the grout dries completely. It worked well for us for Alan to apply the grout and for me to follow behind him with the sponge.

I love the way that the grout makes the tile look! In just a few short minutes, everything appears more finished.

Step 8: Caulk along the counter
The next day, we ran a bead of caulk along the bottom edge of the tile where it met the counter to finish off that edge. To do this, we put down painters tape along the top and bottom edge where we wanted the caulk line, squeezed the caulk between the tape, and ran our finger along the line to smooth it out. After about five minutes, we removed the tape and had beautiful, clean lines!


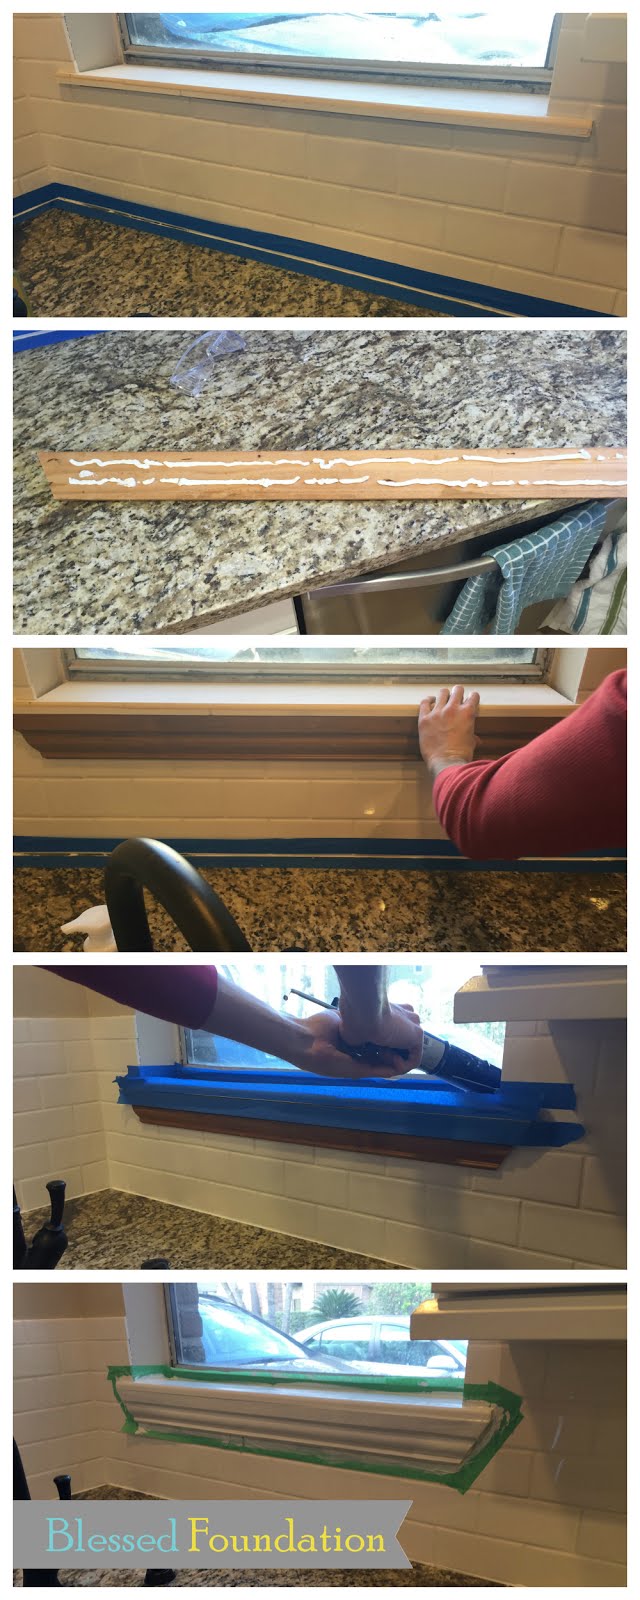
Step 9: Install Window Sill
With the backsplash done, all that was left was to install our window sill. We chose to do a wooden sill instead of tile (like we had before) to go with our "farm-housey" feel. We cut the sill and nailed it down and then cut a board for the apron and applied it to the tiled wall with all-purpose adhesive. Alan caulked the edges and the nail holes. Then, I went back with the paint we use for all our trim and finished it up!
So, there you have it! Our backsplash is in and our kitchen is done (minus a few finishing touches). Be on the lookout for our room reveal soon!

great for any novice out there who's going tiling the first time ,clearly explained
ReplyDeletetravertyn
This is such a lovely and inspiring post! I really enjoyed exploring the different backsplash ideas and how they can completely transform a kitchen space. The designs feel both practical and stylish, making them easy to imagine in real homes. A porcelain subway tile backsplash is definitely a timeless option that adds charm and durability. Thanks for sharing these creative ideas!
ReplyDelete